After I published my last post, I realized that I completely forgot to list yogurt as another staple ingredient to have on hand. I am not talking about light yogurt or flavored yogurt or even plain yogurt. I am not a fan of plain yogurt; I don't like the consistency or the flavor. The must have yogurt to have on hand is Plain Greek Yogurt. It is thick, sour and delicious and very useful in many great Turkish dishes.
It doesn't matter what brand, fat or no fat, but it must NOT be flavored. I actually prefer to flavor my own yogurt using various jams, jellies or fresh fruits. Yogurt can be made into soups, dips, drinks or incorporated into meatballs, potato dishes or egg dishes. I was very surprised that yogurt is such a versatile ingredient. I often find myself using it in place of sour cream.
So, keep some good plain greek yogurt on hand. It's good for you and great for Turkish cooking!
Tuesday, March 5, 2013
Sunday, March 3, 2013
Typical Turkish Ingredients
Ok, so how many of you are thinking to yourselves, "What is Turkish cuisine?" Where I live there is only one Turkish restaurant, and it is about an hour away and not that great. After I learned many Turkish cuisine recipes and techniques from family members I was surprised to learn that Turkish food is delicious and easy to make.
So, how can we classify Turkish food? The easiest thing to compare it to is the good ol' Mediterranean Diet. Most dishes consist of meat and vegetables and usually have a small side of rice. The American diet is very heavy with carbs and butter. Turkish cooking uses a lot of olive oil and fresh ingredients.
I always stock my pantry with Turkish cooking staples so I can whip something up at any time.
Olive Oil (I buy my bottle at my local wholesale store)
Tomato Paste
Canned Tomatoes, any flavor
Onions
Potatoes
Eggs
Flour
Frozen Spinach
Red Pepper flakes
Dried Oregano
Dried Mint
If you stock your pantry with these items, I guarantee you can whip up an easy Turkish meal at any time.
Tuesday, February 19, 2013
New Year, New You!!
Hi Everyone!
I'm back and ready for cooking action! I have been on hiatus lately as far as posting but I can tell you that I have been busy busy busy cooking and experimenting in my kitchen. And as you may have noticed, the my blog has a great new look!! It is also time to start my long time New Year's resolution of getting healthy; (I don't bother saying "Losing weight" anymore because it sounds like too much work!) So I have been challenging myself in being creative in the kitchen but not loose taste in my favorite recipes or cause more work for myself. I have set forth a challenge for myself for my blog and I would love to hear your comments or questions!!
The Challenge: Cooking recipes that are Turkish and Dutch inspired that are healthy to eat!
Coming soon! Stay tuned!
Sunday, November 18, 2012
Dutch Apple Pie Tart
Sorry it has been a while!! Life gets away from you sometimes! And Hurricane Sandy didn't help!
Almost every week we have dinner at my parents house. I always love to bring something homemade. I had a bunch of macintosh apples left over, some puff pastry in my fridge and a cabinet full of spices. I love love love apple pie and the yummy spicy sauce that the apples make. The "guck" the "apple goop", whatever we call it, is my favorite part. This tart did exactly that, and was gobbled up by only five people!
And, this recipe received 5 out of 5 stars. WOOOHOO!!
So if you need a quick go to dessert recipe, try this Dutch Apple Pie Tart! You can use any apples you like in apple pie. I would recommend macintosh, granny smith, gala, fuji or macoon. But you are open to try any of your favorites. I would love to hear any questions or comments you have!
 You will need:
A bunch of apples (5-6)
 1 sheet of puff pastry
1 egg
Flour, about 1-2 tablespoons
Butter
Lemon juice (not pictured)
Sugar
Allspice
Cinnamon
Butter, about 2 tablespoons
Apricot or Peach Jam
Whiskey or bourbon
1. Take the puff pastry sheet out of the fridge and let it stay at room temp for about 10 minutes, or until you can unfold the pastry without tearing it.
2. Roll out the puff pastry with a rolling pin and a little flour, just so the dough doesn't stick to the counter or your rolling pin. I rolled this one out to fit in a lipped cookie sheet.
3. Place the rolled pastry onto a buttered cookie sheet. If you would like to have a crust, fold over a small edge, about an inch of dough, around the edge of the dough. Prick the dough with a fork several times so it won't bubble up in the oven. Place this back into the fridge while you prep the apples.
4. Peel and slice apples about 1/4 inch or thinner. While you are slicing the other apples, sprinkle a little lemon juice on the apples so they don't turn brown.
5. Mix together about 3/4 c sugar and cinnamon and allspice to taste. I like my apples spicy. Sprinkle this mixture in with the apples and on the puff pastry dough.
6. Place the apples onto the puff pastry in any order you like. You can dump them like you do in an apple pie or layer them neatly like I did. If you have left over sugar/spice mix, sprinkle some more over the top. Cut up a few tablespoons of butter and dot around the apples. You can omit this step if you are trying to save calories, however, a few tablespoons of butter won't kill you! Plus, the butter makes it taste better!
7. Place into a 375F degree oven and bake until done. This took about 20 minutes. The apples and crust will be nice and golden brown.
8. If you want to add an extra depth of flavor, then make a glaze with apricot or peach jam and whiskey. Take a few spoonfuls of jam into a microwave safe dish. Microwave for about 15 seconds or until jam is liquified. Mix in 1 tablespoon of your favorite whiskey or bourbon. I happened to have a bottle of Maker's Mark 46. Mix well and use a pastry brush to glaze the Apple Tart! Make sure to do this step right after the tart comes out of the oven.
9. Serve warm or room temp. Do not serve cold. You can add ice-cream, cool whip or whipped cream. Enjoy!!!
Almost every week we have dinner at my parents house. I always love to bring something homemade. I had a bunch of macintosh apples left over, some puff pastry in my fridge and a cabinet full of spices. I love love love apple pie and the yummy spicy sauce that the apples make. The "guck" the "apple goop", whatever we call it, is my favorite part. This tart did exactly that, and was gobbled up by only five people!
And, this recipe received 5 out of 5 stars. WOOOHOO!!
So if you need a quick go to dessert recipe, try this Dutch Apple Pie Tart! You can use any apples you like in apple pie. I would recommend macintosh, granny smith, gala, fuji or macoon. But you are open to try any of your favorites. I would love to hear any questions or comments you have!

A bunch of apples (5-6)
 1 sheet of puff pastry
1 egg
Flour, about 1-2 tablespoons
Butter
Lemon juice (not pictured)
Sugar
Allspice
Cinnamon
Butter, about 2 tablespoons
Apricot or Peach Jam
Whiskey or bourbon
1. Take the puff pastry sheet out of the fridge and let it stay at room temp for about 10 minutes, or until you can unfold the pastry without tearing it.
2. Roll out the puff pastry with a rolling pin and a little flour, just so the dough doesn't stick to the counter or your rolling pin. I rolled this one out to fit in a lipped cookie sheet.
 |
| Add a crust lip to the tart if you choose. |
4. Peel and slice apples about 1/4 inch or thinner. While you are slicing the other apples, sprinkle a little lemon juice on the apples so they don't turn brown.
 |
| Slice apples 1/4 in or thinner. |
 |
| Sugar and spice mixture. |
 |
| Apple Tart before the oven. |
8. If you want to add an extra depth of flavor, then make a glaze with apricot or peach jam and whiskey. Take a few spoonfuls of jam into a microwave safe dish. Microwave for about 15 seconds or until jam is liquified. Mix in 1 tablespoon of your favorite whiskey or bourbon. I happened to have a bottle of Maker's Mark 46. Mix well and use a pastry brush to glaze the Apple Tart! Make sure to do this step right after the tart comes out of the oven.
9. Serve warm or room temp. Do not serve cold. You can add ice-cream, cool whip or whipped cream. Enjoy!!!
Wednesday, October 10, 2012
Herbed Goat Cheese Stuffed Chicken Breasts
This recipe sort of came to me one day after my husband and I discovered we love goat cheese and bought the biggest goat cheese log at our local wholesale store. So, I wanted to use up the goat cheese before it spoils. I also had a lot of chicken breasts in the freezer and I needed something new to try. This recipe can be modified depending on your tastes or whatever you have in the fridge and pantry.
This recipe scored 4 stars.
You will need:
 2-4 boneless, skinless chicken breasts
plain bread crumbs
italian seasoning
dried parsley
garlic powder
salt and pepper
herbed or plain goat cheese
olive oil
toothpicks or wooden skewers
1. Pound out the chicken breasts using a mallet until they are about 1/4 inch thick or thinner. I like to pound my chicken in a ziplock bag or between two pieces of parchment paper.
2. In a small bowl, measure out about 1/2 cup plain bread crumbs. This is where you can get creative with the spices. I added dried parsley ( about a tablespoon or two), some garlic powder (1-2 tsp) and salt and pepper. You could also add fresh crushed garlic.
3. Lay out the chicken breasts and spread or crumble some goat cheese. Roll the chicken breasts and secure with toothpicks or wooden skewers. Lay in a greased baking down seam side down.
4. Sprinkle some olive oil and bread crumbs on top of the chicken breasts.
5. Bake for 20 minutes at 375F or until brown.
6. Pair this with rice, noodles or a salad and a vegetable.

I served this with a very Dutch recipe called "Boora Kole". I am not sure of the spelling but it is a typical fall side dish my mother makes. I will attach the recipe soon. Boora Kole is made of mashed potatoes and kale with some seasonings.
You could also add sun dried tomatoes, fresh tomatoes, olives, asparagus or spinach to the goat cheese filling. Get creative and let me know what you try!!
This recipe scored 4 stars.
You will need:

plain bread crumbs
italian seasoning
dried parsley
garlic powder
salt and pepper
herbed or plain goat cheese
olive oil
toothpicks or wooden skewers
1. Pound out the chicken breasts using a mallet until they are about 1/4 inch thick or thinner. I like to pound my chicken in a ziplock bag or between two pieces of parchment paper.
 |
| Step #3 |
3. Lay out the chicken breasts and spread or crumble some goat cheese. Roll the chicken breasts and secure with toothpicks or wooden skewers. Lay in a greased baking down seam side down.
 |
| Step #4 |
5. Bake for 20 minutes at 375F or until brown.
6. Pair this with rice, noodles or a salad and a vegetable.

I served this with a very Dutch recipe called "Boora Kole". I am not sure of the spelling but it is a typical fall side dish my mother makes. I will attach the recipe soon. Boora Kole is made of mashed potatoes and kale with some seasonings.
You could also add sun dried tomatoes, fresh tomatoes, olives, asparagus or spinach to the goat cheese filling. Get creative and let me know what you try!!
Dutch Apple Walnut Cake
This recipe scored: 4 Stars
I found this recipe in the cookbook for my bread machine. I have a Zojirushi Bread Machine and I love it. But you don't need a bread machine to make this wonderful cake!
You will need:

3 Large eggs
1/2 cup vegetable oil or butter (butter is better, especially if melted!)
1 tsp vanilla extract
1 cup sugar
1/2 tsp allspice
2 tsp cinnamon
2 cups All Purpose Flour ( personally I love King Arthur)
3 tsp baking powder
1 tsp baking soda
1/2 tsp salt
2 apples, peeled and chopped finely
1/2-1 cup walnuts, or any nut of choice
*If you are baking this in the oven, you will need a bread pan, glass or metal of choice. Just make sure to grease with cooking spray or butter*
Steps:
Bread Machine
1. Mix together the eggs, oil or butter, vanilla, sugar and spices together in a bowl.
2. Dump the dry ingredients into your bread machine.
3. Pour wet ingredients and select the cake cycle.
4. Once ingredients are well mixed, add in the apples and nuts.
Conventional Oven
1. Mix together the eggs, oil or butter, vanilla, sugar and spices together in a bowl.
2. In a separate bowl, mix together flour, baking powder, baking soda and salt until well combined.
3. Slowly mix dry ingredients into wet ingredients, mixing well.
4. Toss in chopped apples and nuts, mixing well.
5. Bake at 350 degrees F until a toothpick comes out clean. 30-45 minutes.
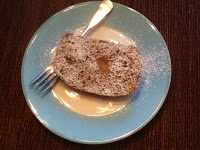
I served this with powdered sugar, although my husband enjoyed a slice slathered with butter! Enjoy!

I found this recipe in the cookbook for my bread machine. I have a Zojirushi Bread Machine and I love it. But you don't need a bread machine to make this wonderful cake!

 |
| Chopped apples and walnuts |
 |
| Zojirushi Bread Machine |
3 Large eggs
1/2 cup vegetable oil or butter (butter is better, especially if melted!)
1 tsp vanilla extract
1 cup sugar
1/2 tsp allspice
2 tsp cinnamon
2 cups All Purpose Flour ( personally I love King Arthur)
3 tsp baking powder
1 tsp baking soda
1/2 tsp salt
2 apples, peeled and chopped finely
1/2-1 cup walnuts, or any nut of choice
*If you are baking this in the oven, you will need a bread pan, glass or metal of choice. Just make sure to grease with cooking spray or butter*
Steps:
Bread Machine
1. Mix together the eggs, oil or butter, vanilla, sugar and spices together in a bowl.
2. Dump the dry ingredients into your bread machine.
3. Pour wet ingredients and select the cake cycle.
4. Once ingredients are well mixed, add in the apples and nuts.
Conventional Oven
1. Mix together the eggs, oil or butter, vanilla, sugar and spices together in a bowl.
2. In a separate bowl, mix together flour, baking powder, baking soda and salt until well combined.
3. Slowly mix dry ingredients into wet ingredients, mixing well.
4. Toss in chopped apples and nuts, mixing well.
5. Bake at 350 degrees F until a toothpick comes out clean. 30-45 minutes.
I served this with powdered sugar, although my husband enjoyed a slice slathered with butter! Enjoy!


Subscribe to:
Posts (Atom)